Microstructure and Mechanical Properties of Continuous Welded 50N Rail
Article information
Abstract
Rails are subjected to repeated stresses due to wheel-rail contact during train service. Rails under stress conditions undergo microstructural changes, and these cause degradations of the structural integrity and lifetime of rails. In this study, three different rails (newly-manufactured rail, newly-manufactured head-hardened rail, and worn (used) rail) were compared to examine the effects of heat treatment and repeated wheel-rail contact stress on the microstructure and mechanical behavior of continuous welded rail. The crystal structure, constituent phase distribution, tensile property, and hardness were investigated at various locations along a cross section of the rails. All three rails consisted of a mixture of BCC and FCC crystal structures as a majority phase with a very small amount of cementite (Fe3C) as a minor phase. Rietveld analysis revealed that the weighted fractions of the BCC crystal structure were approximately 74%, 64%, and 85% for the new rail, head-hardened rail, and worn rail, respectively. While the web and foot areas of the three rails showed no significant differences in mechanical properties, the railheads of the three rails revealed much higher yield strength, tensile strength, and hardness. The highest tensile strength and hardness were measured at the railhead in the head-hardened rail, and were attributed to the evolution of the bainite phase, generated by additional heat treatment. The higher mechanical strength of the railhead of the worn rail is thought to have resulted from a combination of work hardening and smaller lamellar spacing of the pearlite phase, induced by repeated wear processes during train operation.
1. INTRODUCTION
Railways are facilities and transportation systems used for driving passenger or freight transport vehicles. Rails have long been used as convenient and important means of transportation to convey goods and passengers from one place to another. One of the main challenges of enhancing railway competitiveness is to ensure trains with higher speed and comfortable ride. As vehicle speed increases, continuous welded rails, obtained by welding multiple rails into one part, have been required to ensure stability at higher speed. However, due to continuous wheel-rail contact during operation, the rail is constantly subjected to repeated stresses, which can lead to catastrophic failure. Moreover, with increased transportation volume, more loads are being applied to rails, and brittle fractures can occur due to crack formation inside the rail. Fatigue can also lead to fatal accidents by reducing rail lifetime. Therefore, in order to prevent accidents, it is very important to understand rail damage that accumulates during service.
Rails are subjected to normal loads by train wheels, shear loads by traction, and breaking or flange contact [1,2]. Most severe problems occur in the railhead, where loads are concentrated directly at the wheel-rail contact. Repetitive stresses that are even less than yield strength can lead to railhead failure due to fatigue. Cannon et al. [3] reported that rolling contact fatigue (RCF) on rails caused major defects, such as head checks, cracks, and squats on the railhead surface. Carroll and Beynon [4] reported that the white-layered microstructure promoted wear or cracking of the rail by RCF, and they emphasized that a crack originating at the interface between pearlite and the white layer can grow very deeply along the white layer and break the rail. Cookson and Mutton [5] reported that the corrosion of rail defects by environmental factors like water can promote rail failure and increase the possibility of crack initiation and growth. Many investigations have been devoted to examining the effects of fatigue on pearlitic and bainitic rails [6-10]; defect analyses have been performed using hardness tests, microstructural analysis, and simulation [11-18]. Research on detection and prevention using non-destructive methods such as acoustic emissions and microwave sensors have been widely performed [5,19-25].
Recently, various types of rails have been developed for many important purposes by adding alloying elements during production and post heat treatment. Moreover, the initial manufactured state (e.g., microstructure) of rails is known to gradually change with the accumulation of damage due to repeated wheel-rail contact. These mechanical stress conditions influence the material resistance and properties. Therefore, it is critical to investigate changes in rail microstructure as a function of damage, and the influence that damage has on the rail’s mechanical properties.
In this study, the microstructure and mechanical properties of continuous welded 50N rail were examined. The crystal structure, phase distribution, tensile property, and hardness were measured along the cross-section of the rail. More importantly, three different rails (newly-manufactured rail, newly-manufactured head-hardened rail, and worn (used) rail) were compared to investigate the effects of heat treatment and material degradation during train operation.
2. EXPERIMENTAL DETAILS
2.1 Materials
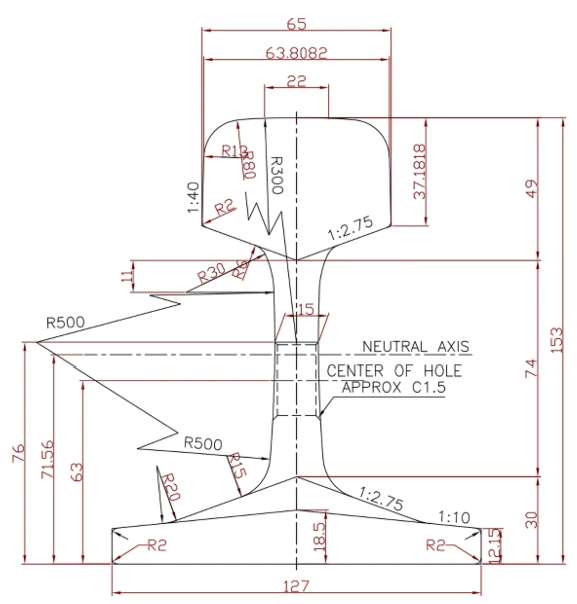
Figure 1 shows the cross-sections of continuous welded 50N (a) new rail, (b) head-hardened rail, and (c) worn rail. The “50N” is a symbol determined by the calculated weight per meter based on KRS TR 0001-15(R). The standard code of new rail followed KS R 9106, and the standard code of head-hardened rail was KS R 9110. The new rail (Fig 1a) was conventionally-used newly-manufactured rail; the head-hardened rail (Fig 1b) was also newly-manufactured rail that was additionally heat-treated during the manufacturing process. The heat treatment process for the head-hardened rail involved reheating just the head part of the rail to 800 ~ 1000 ºC after the entire rail was heated by electric induction heating device at 500~600 ºC. Then, air mist was sprayed to cool down the railhead after slack quenching down to 500 ºC. The worn rail (Fig 1c), which was in use on the Gyeongbu line in Korea since 2002, experienced a total gross tonnage of 550 MGT. The dimensions and nominal chemical compositions of the rails are shown in Fig 2 and Table 1, respectively. Mechanical properties of the standard 50N rail are provided in Table 2.
2.2 Microstructural observation
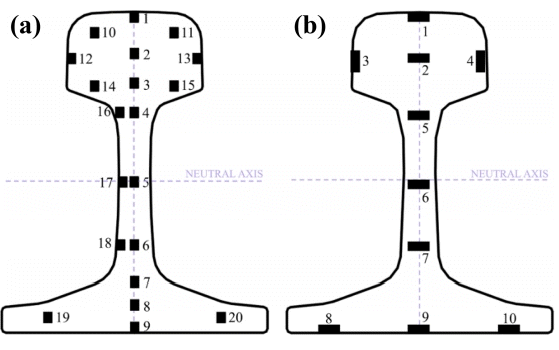
The microstructure of the rail was examined using optical microscopy (OM) and scanning electron microscopy (SEM) for samples cut from twenty locations selected from the cross sections of the rails, as shown in Fig 3a. All of the specimens were prepared by electrical discharge machining (EDM). For microstructural observation, the specimens were polished with up to 3 μm diamond suspension, and etching was conducted using 4% nital solution as etchant for 15 ~ 20 sec. OM images were taken using an Olympus BX51M and SEM images were taken using an FEI Magellan 400 at 10 kV. To estimate the size of the ferrite nodules, Electron backscatter diffraction (EBSD) was performed with a step size of 0.8 μm. The X-ray diffraction (XRD) pattern was measured from 30° to 110° on a Rigaku D/MAX-2500. Then, using the Rietveld refinement with the Fullprof program, the XRD diffraction data were analyzed to obtain information about the quantitative phase fraction.
2.3 Mechanical testing
Tensile tests and hardness measurements of the new rail, head-hardened rail, and worn rail were performed to investigate the effects of crystal structure and microstructure on mechanical behavior. Dog-bone cylindrical tensile specimens were prepared using EDM. The specimens were cut from ten locations chosen in the cross section, as indicated in Fig 3b. Tensile testing with a strain rate of 10 -4/s was carried out at room temperature in air atmosphere until the specimens were fractured. The tensile loading direction was the longitudinal direction of the rail. Vickers hardness tests were carried out in the cross-sectional plane, which was perpendicular to the longitudinal direction. Intervals between indentation were 1.3 mm, and indentation force was 0.3 kgf.
3. RESULTS
3.1 Crystal structure
Figure 4 shows X-ray diffraction (XRD) patterns for the (a) new rail, (b) head-hardened rail, and (c) worn rail. With XRD, it is very difficult to distinguish ferrite from partial bainite and partial martensite. Hence, ferrite, bainite (body-centered cubic, BCC) and martensite (body-centered tetragonal, BCT) were all considered to be BCC for the current analysis. All three rails consisted of a mixture of BCC and face-centered cubic (FCC) crystal structures as a majority phase with a very small amount of cementite (Fe3C) as a minor phase. Rietveld analysis revealed that the weighted fractions of the BCC crystal structure were approximately 74%, 64%, and 85% for the new rail, head-hardened rail, and worn rail, respectively (Fig 5).
3.2 Microstructural analysis
Figure 6 provides OM images measured at the various positions indicated in Fig 3a. The three rails had different microstructures in the railhead, while the other positions had similar pearlite structures. In location 9 (the middle surface of the foot), an increased portion of pro-eutectoid ferrite was found for all three rails. Compared to the microstructure at location 1 (the head surface of the three rails), the new rail showed pearlite and a small amount of pro-eutectoid phase, while the head-hardened rail exhibited a bainite structure showing elongated sharp cementite (Fe3C) within the ferrite phase, which was distinct from the general pearlite structure shown in the web and foot locations. This was due to the effect of the additional heat treatment followed by moderate cooling.
The railhead microstructure of the worn rail was different: a deformed microstructure with texture was observed, as shown in location 1 in Fig 6c. The microstructure of the worn rail at location 1 resulted from plastic deformation by repeated wheel-rail contact stress; no deformed microstructure was observed at other locations beneath the railhead surface.
3.3 Mechanical properties
Stress-strain responses in tension were compared for the three rails, and the results are shown in Fig 7. For all three rails, the tensile strength at location 1 had values 100~200 MPa higher than those of other locations. While higher tensile strength was found at only location 1 (top surface of the head) for the new rail and the worn rail, the head-hardened rail showed higher tensile strength at several locations (1, 2, 3, and 4, as shown in Fig 3b) near the top of the railhead. The tensile strengths at locations 1~4 in the head-hardened rail were approximately 1000 MPa. The elongation of the head-hardened rail was about 8 to 12%, which was shorter than those of the other two rails (about 18%).
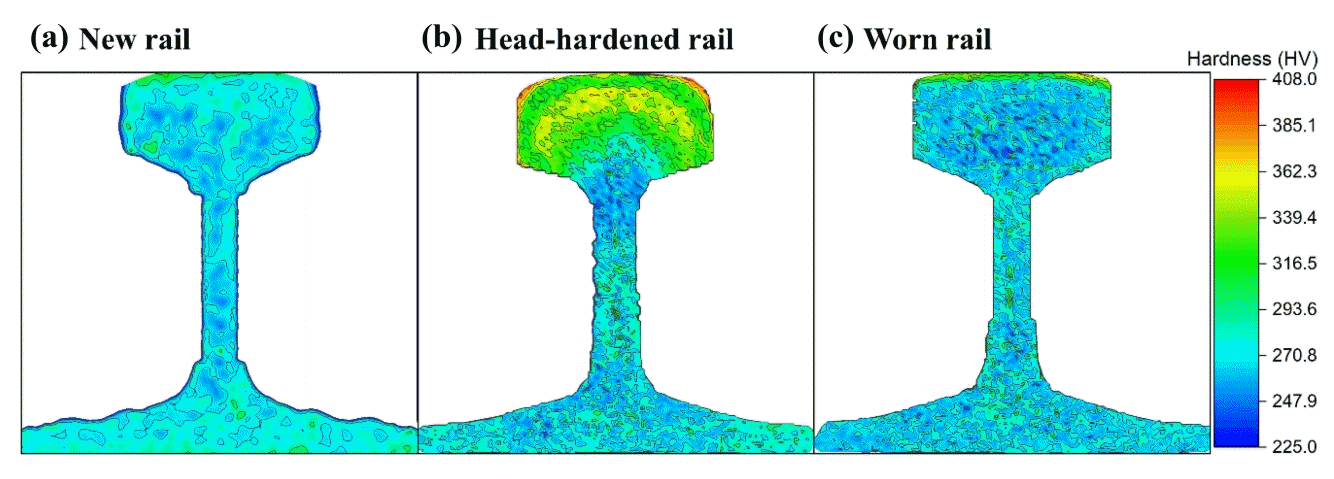
Figure 8 provides mapping of hardness measurements for the three rails. In the new rail, a hardness of about 270 HV was measured in the railhead and feet, and a relatively low hardness value was measured in the middle location. The head-hardened rail showed the highest hardness, of over 300 HV, in the area of the railhead. The hardness values in the other positions of the head-hardened rail were similar to those of the new rail. Compared to the new rail, the worn rail exhibited similar hardness except for the railhead surface, which had relatively higher values.
4. DISCUSSION
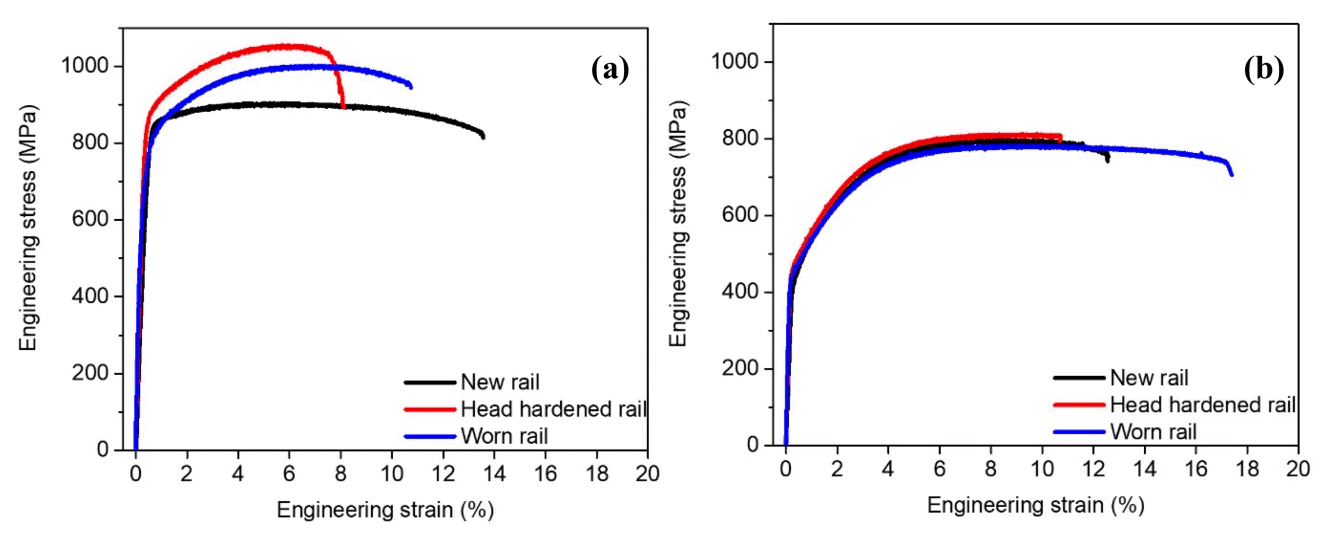
Figure 9 presents a comparison of the stress-strain responses for the new rail, head-hardened rail, and worn rail for location 1 (top surface of the railhead) and location 7. It should be noted that the yield strength and tensile strength at location 1 were much higher than those values at location 7. More specifically, the yield strength and tensile strength of the three rails at location 1 were, respectively, approximately 1.6-1.8 times and 1.1-1.3 times higher than those at location 7. The mechanical test results were consistent with the hardness measurements, indicating that the highest hardness values were obtained at location 1.

Comparison of tensile stress-strain behavior among the three rails at (a) location 1 and (b) location 7.
It is interesting to compare the mechanical properties among the three rails for the same location. While the yield strength and tensile strength of the three rails were very close in location 7 regardless of the types of rails, some differences were found at location 1 (Fig 9a). Though the yield strengths of the new rail and worn rail at location 1 were very similar, the worn rail showed higher strain hardening and tensile strength. The head-hardened rail revealed yield strength and tensile strength slightly higher than those of the other two rails. More detail on the mechanical testing results is provided in Table 3.

Summary of yield strength (YS) and tensile strength (TS) of new rail, head-hardened rail, and worn rail at locations 1 and 7.
The different mechanical properties among the three rails are closely related to their distinct microstructures. The microstructures at location 7 for the three rails exhibited a very similar pearlitic structure, which resulted in similar mechanical strength, as shown in Fig 9b. On the other hand, the head-hardened rail with the highest yield and tensile strength at location 1 (railhead) revealed a quite different microstructure, as shown in Fig 10b. A cementite, a sharply elongated form of Fe3C, was dispersed within the ferrite matrix, indicating a bainite structure. The ferrite nodules in the head-hardened rail were finer than those in the new rail. It is known that cementite within the ferrite matrix in the bainite structure acts as an obstacle to dislocation movement, which increases the strength, hardness, and wear rate [26-28].

OM, SEM, and EBSD images at locations 1 and 7: (a) new rail, (b) head-hardened rail, and (c) worn rail.
Lamellar spacing in pearlite steel is determined by the austenization temperature and cooling rate during the heat treatment process [29-31]; pearlitic steel is strengthened by decreased lamellar spacing and increased dislocation density, and by the solution of carbon atoms in the ferrite matrix, as reported by Scheriau and Pippan [32]. That being so, it is thought that microstructural refinement of the bainitic structure resulted in greatly increased mechanical strength in the head region of the head-hardened rail.
Figure 9a shows that the tensile strength of the worn rail was between those of the new rail and the head-hardened rail; the strain hardening rate of the worn rail was higher than that of the new rail. Note that the worn rail is a used rail that underwent repeated wheel-rail contact stresses during train service since 2002. Figure 10c shows that the microstructure of the railhead in the worn rail was totally different from that in the new rail. The worn rail had a pearlitic microstructure at location 1, as observed in the new rail. However, the lamellar structure consisting of ferrite and cementite became significantly distorted, as confirmed by EBSD mapping (Fig 10c). The pronounced lattice distortion indicates an increase in dislocation density, which should be responsible for an increase in the strain hardening rate and tensile strength of the worn rail. Moreover, it is thought that the smaller lamellar spacing shown in the distorted pearlite phase also contributed to the strengthening of the worn rail.
5. CONCLUSIONS
We examined the effects of heat treatment and wear on the microstructure and mechanical properties of continuous welded 50N rail using samples of new rail, head-hardened rail, and worn rail. The main findings are summarized below.
All three rails consisted of a mixture of body-centered cubic (BCC) and face-centered cubic (FCC) crystal structures with a very small amount of carbide. XRD analysis revealed that the weighted fractions of the BCC crystal structure were approximately 74%, 64%, and 85% for the new rail, head-hardened rail, and worn rail, respectively.
The railhead of the worn rail exhibited some texture due to repeated wheel-rail contact, and had undergone significant distortion of its lamellar pearlite structure. A bainite phase appeared only in the railhead of the head-hardened rail; pearlite with proeutectoid phase was observed in the web and foot locations of all three rails.
While the web and foot areas of the three rails showed no significant differences in mechanical properties, the railheads of the three rails exhibited different levels of yield strength, tensile strength, and hardness. The head-hardened rail had the highest values among the three rails.
The differences in the mechanical properties of the rails were closely related to their distinct microstructures. The higher mechanical strength of the railhead of the worn rail might be thought to result from a combination of work hardening and smaller lamellar spacing of the pearlite phase, induced by repeated wear processes during train operation. The very high tensile strength and hardness of the head-hardened rail were attributed to bainite phase transformed by additional heat treatment.
Acknowledgements
This research was supported by a grant (No. 19RTRPB113580-04) from the Railroad Technology Research Program (RTRP), funded by Ministry of Land, Infrastructure and Transport of the Korean government.


